Finer04's Blog
首页
乱写一通
脑洞破文
随便谈谈
当前播放.page
临时解决使用 ES 数据库的 Zabbix 使用 Grafana 无法采集的问题
Finer04
December 20, 2023
6281 字
文章目录
去了新公司参与监控运维平台的建设,我都差不多搞定了 Zabbix 的搭建和系统纳管了。正准备弄个 Grafana 给领导看监控大屏来表现价值,开开心心要做面板的时候突然报错了,选好监控项的时候一直 `no data`。看了下 Query 发现返回的数据报错了,报错内容是 `Error: json: invalid use of ,string struct tag, trying to unmarshal unquoted value into int64`。 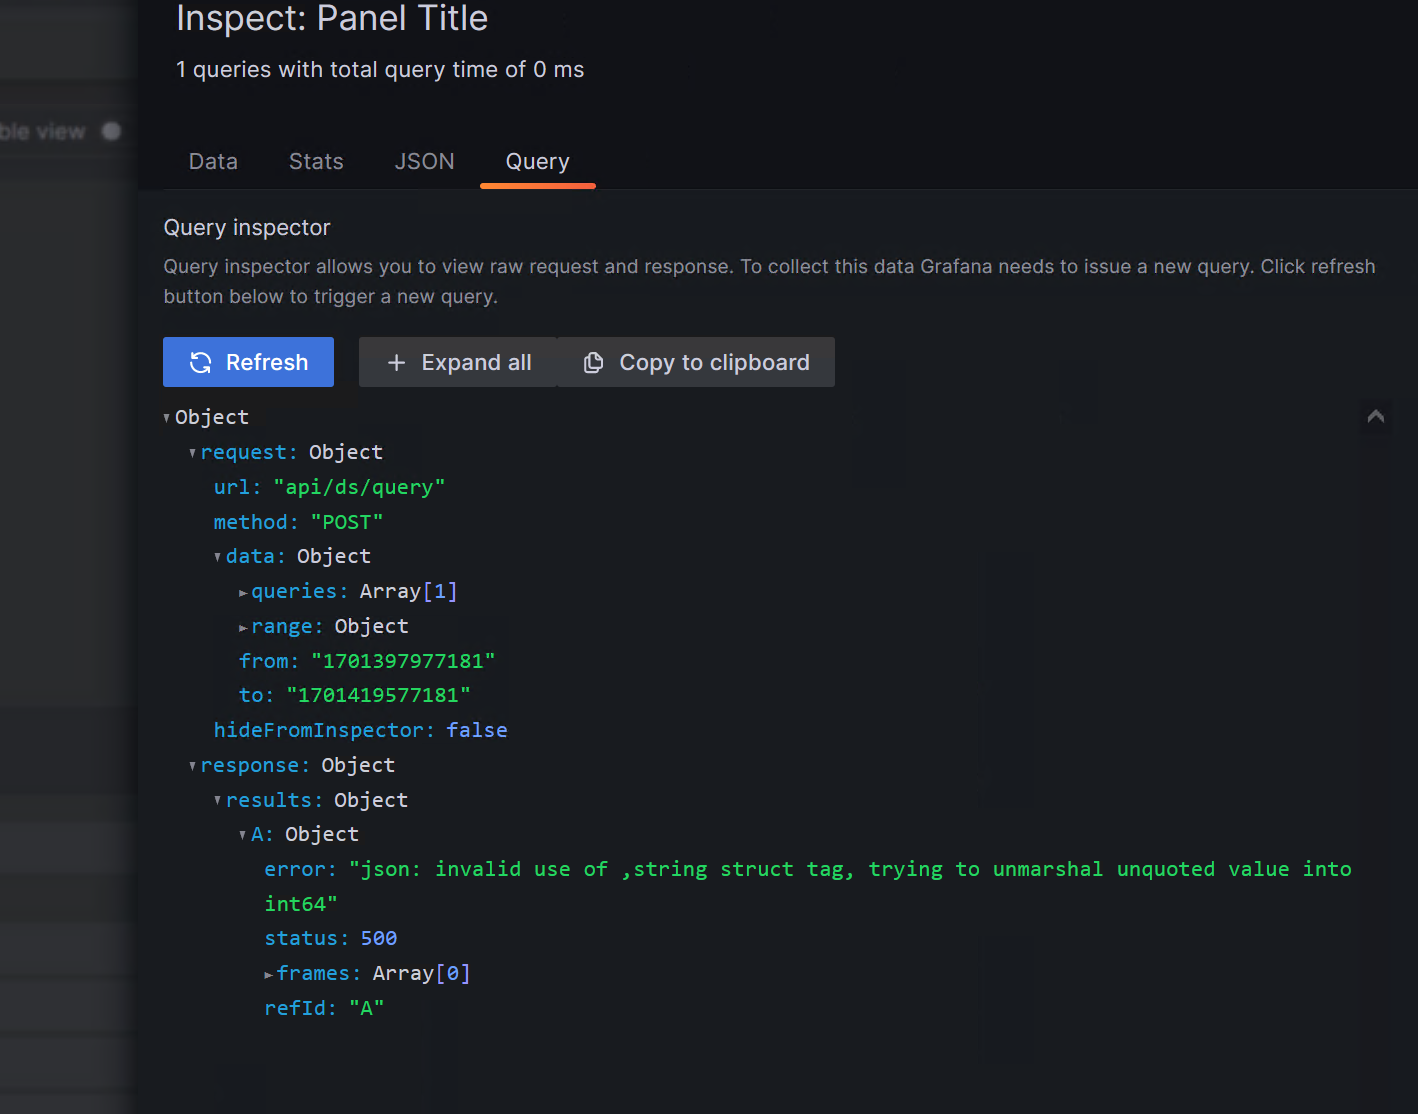 查了一下,现在的 Grafana 的 Zabbix 数据源插件使用 zabbix 6.0 LTS + elasticsearch 作为历史数据的数据库 + MySQL 配置数据库的环境下会发生这种问题,我想不应该啊作者应该会发现这种问题吧。我以前还在用 zabbix 5.0 的时候也是用 es 数据库但数据也可以正常输出。抛下疑问先不说,还是想办法处理吧。 经过搜索,在该插件的有一条已经闭单的 issue 出现跟我一样报错的问题:[Error: json: invalid use of ,string struct tag, trying to unmarshal unquoted value into int64](https://github.com/grafana/grafana-zabbix/issues/1386)。文中的 Ethan0451 大佬其实已经发现并给出临时的解决方法,简单来说就是使用 es 数据库返回数据与作者写的代码有冲突从而报错。只要修改 5 行代码重新编译就好了。 这个是去年的 issue ,到现在还没修,看了下其实有人发起了 Pull request 了,但是没有成功。 ## 处理方法 因为我要迫切解决,因此按着大佬的意思得自己重新编译 ### 安装编译必备环境 Zabbix 数据源插件的文档有自行编译的方法,需要安装 `Go version 1.14 或以上` 和 `NodeJs LTS`。由于服务器是离线环境,因此我是用 WSL Debian 自己编译的。 # 安装 gcc 和 make 必备组件,如果可以执行 make 命令的话可忽略 apt install gcc apt install make apt install g++ # 安装 Golang 请查阅参考资料:Linux下安装Go环境 https://www.jianshu.com/p/c43ebab25484 # 安装 Node.js 请查阅参考资料:Node.js 安装配置 https://www.runoob.com/nodejs/nodejs-install-setup.html 这里直接下二进制包即可,https://nodejs.org/dist/v20.10.0/node-v20.10.0-linux-x64.tar.xz # 安装yarn ## 先删除系统的 yarn apt remove cmdtest apt remove yarn ## 安装 yarn npm install --global yarn 如果命令没找到,可能要重开终端或者环境变量有问题(建议找到 yarn 的二进制文件然后直接 ln -s 到 /usr/local/bin) ## 安装 mage 下载 https://github.com/magefile/mage/releases 最新的 mage_1.15.0_Linux-64bit.tar.gz 解压 mage 文件,也是直接挂载到 ln -s 到 /usr/local/bin 测试 mage -V 是否有输出 ## 设置好 Go 代理,确保编译顺利 go env -w GOPROXY=https://goproxy.cn,direct ### 更改代码 详情修改代码见 [Fix working in zabbix with elastic backend #1514](https://github.com/grafana/grafana-zabbix/pull/1514/commits/08ec4a41b341aee9fc14bef3c635e12b17bce3b5)。 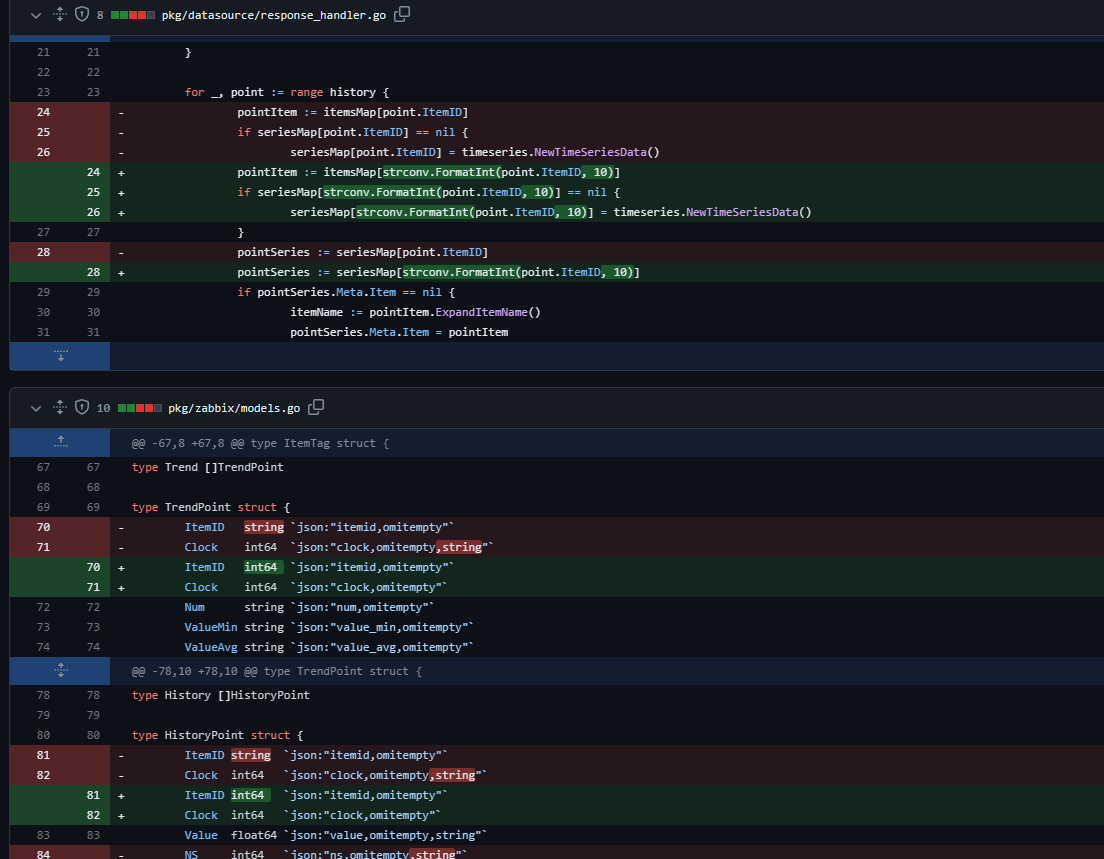 # 克隆源码 git clone https://github.com/grafana/grafana-zabbix.git # 更改 response_handler.go 的代码,大概在 26 行 - 30行 vi grafana-zabbix/pkg/datasource/response_handler.go 源代码: for _, point := range history { pointItem := itemsMap[point.ItemID] if seriesMap[point.ItemID] == nil { seriesMap[point.ItemID] = timeseries.NewTimeSeriesData() } pointSeries := seriesMap[point.ItemID] 改成: pointItem := itemsMap[strconv.FormatInt(point.ItemID, 10)] if seriesMap[strconv.FormatInt(point.ItemID, 10)] == nil { seriesMap[strconv.FormatInt(point.ItemID, 10)] = timeseries.NewTimeSeriesData() pointSeries := seriesMap[strconv.FormatInt(point.ItemID, 10)] # 更改 models.go 代码 vi grafana-zabbix/pkg/zabbix/models.go 源代码: type TrendPoint struct { ItemID string `json:"itemid,omitempty"` Clock int64 `json:"clock,omitempty,string"` 改成: type TrendPoint struct { ItemID int64 `json:"itemid,omitempty"` Clock int64 `json:"clock,omitempty"` 源代码: type HistoryPoint struct { ItemID string `json:"itemid,omitempty"` Clock int64 `json:"clock,omitempty,string"` 改成: type HistoryPoint struct { ItemID int64 `json:"itemid,omitempty"` Clock int64 `json:"clock,omitempty"` 找到 NS int64 `json:"ns,omitempty,string"` 把后面的 ,string 删掉 ### 开始编译 编译结束后,把目录的 `dist` 的所有文件打包成压缩包或移动到 `/var/lib/grafana/plugins/alexanderzobnin-zabbix-app`。打包或移动前,`gpx_zabbix-plugin` 开头的文件是二进制文件,我们根据系统只留对应的二进制程序(gpx_zabbix-plugin_linux_amd64),其他二进制文件可以删掉了。 # 开始编译 cd grafana-zabbix/ make dist # 刚开始会问选 webpack 要哪个模式,输入第一个即可,即 webpack-cli # 大概 4 分钟内可以编译完毕 root@DESKTOP-LLUGD5P:/home/grafana-zabbix# cd dist/ root@DESKTOP-LLUGD5P:/home/grafana-zabbix/dist# ls -l total 174200 -rw-r--r-- 1 root root 38514 Dec 20 22:18 CHANGELOG.md drwxr-xr-x 4 root root 4096 Dec 20 22:18 datasource -rwxr-xr-x 1 root root 3177 Dec 20 22:28 go_plugin_build_manifest -rwxr-xr-x 1 root root 24650784 Dec 20 22:29 gpx_zabbix-plugin_darwin_amd64 -rwxr-xr-x 1 root root 24375730 Dec 20 22:29 gpx_zabbix-plugin_darwin_arm64 -rwxr-xr-x 1 root root 21925888 Dec 20 22:29 gpx_zabbix-plugin_freebsd_amd64 -rwxr-xr-x 1 root root 21037056 Dec 20 22:29 gpx_zabbix-plugin_freebsd_arm64 -rwxr-xr-x 1 root root 21848064 Dec 20 22:29 gpx_zabbix-plugin_linux_amd64 -rwxr-xr-x 1 root root 20905984 Dec 20 22:29 gpx_zabbix-plugin_linux_arm -rwxr-xr-x 1 root root 21037056 Dec 20 22:29 gpx_zabbix-plugin_linux_arm64 -rwxr-xr-x 1 root root 22485504 Dec 20 22:29 gpx_zabbix-plugin_windows_amd64.exe drwxr-xr-x 2 root root 4096 Dec 20 22:18 img -rw-r--r-- 1 root root 11379 Dec 20 22:18 LICENSE -rw-r--r-- 1 root root 921 Dec 20 22:18 module.js -rw-r--r-- 1 root root 3807 Dec 20 22:18 module.js.map drwxr-xr-x 3 root root 4096 Dec 20 22:18 panel-triggers -rw-r--r-- 1 root root 1544 Dec 20 22:28 plugin.json -rw-r--r-- 1 root root 3035 Dec 20 22:28 README.md drwxr-xr-x 2 root root 4096 Dec 20 22:18 styles # 最后记得给二进制文件赋予执行权限,否则前端报错 Plugins unavailable chmod +x gpx_zabbix-plugin_linux_amd64 ### 修改 Grafana 配置文件 我的 Grafana 是用 Docker 部署的,所以挂载问题需要自行处理,docker cp 也好都行。由于我们自己编译的插件是没有经过 Grafana 签名的,所以默认状态下是无法使用的,因此需要编辑 `grafana.ini`,该配置参考 [grafana启用未签名插件](https://blog.csdn.net/qq_32014795/article/details/118730387) [plugins] enable_alpha = true # 如果你想测试还没有准备好普遍使用的 alpha 插件,设置为 true。默认是假的。 allow_loading_unsigned_plugins = alexanderzobnin-zabbix-datasource,alexanderzobnin-zabbix-app # 输入一个逗号分隔的插件标识符列表,以识别要加载的插件,即使它们是无符号的。修改签名的插件永远不会被加载。 plugin_admin_enabled = true # 只对 Grafana 管理员开放,默认情况下插件管理应用设置为 false。设置为 true 以启用应用程序。 plugin_admin_external_manage_enabled = true # 如果您想启用外部插件管理,请设置为 true。默认是假的。这只适用于 Grafana Cloud 用户。 ### 验证 设置完毕后,去 Grafana 的插件,先禁用再开启 Zabbix 插件,会提醒 Unsigned 但可以忽略。最后去数据源中跑下 Test,最后回到 Query 跑个数据能否正常显示即可。我现在不想进回堡垒机了,所以这边不截图了。
评论已关闭
▲ Top
评论已关闭